Автор:
In the first two videos in the set, I introduce and lay a strong foundation for concepts such as
layers, adjustment layers, layer masks, and luminosity masks. I show you in detail how to make
and use these, and I demonstrate various ways to use them with examples on some of my images.In my next video, Color, I take you through various different tools that I use when working with
color, from the RAW stage into Photoshop. I demonstrate how to make various localized color
adjustments to both color tone, and saturation. I also demonstrate how I use saturation and
vibrance masks in my editing on some of my images.In my next 3 videos, I introduce some of my favorite tips and editing tools, such as how I use
the Orton effect, adjusting contrast locally, and sharpening images for the web and for print. In
my Orton video, How I Use the Orton Effect I explain my method for creating the Orton Effect, and
do it as an action. You can follow along and have the action all made and ready to go by the time
the video is finished. I explain how I use it, as well as some alternative Orton Effects that I
sometimes use. I also explain how to use these in combination with luminosity masks. I explain
how to sharpen for web as an action as well in Sharpening Images For the Web and For Print. In
Local Contrast and Brilliance I demonstrate 3 different ways that I adjust the micro-contrast, or
localized contrast in my images.In my final video, Raw Preparation, Hand Blending Mulitiple Exposures Using Luminosity Masks, and
Depth of Field Blending, I take you through a complete edit of two of my images from the RAW
stage to finish, putting most of the techniques described in the previous videos to the test. We
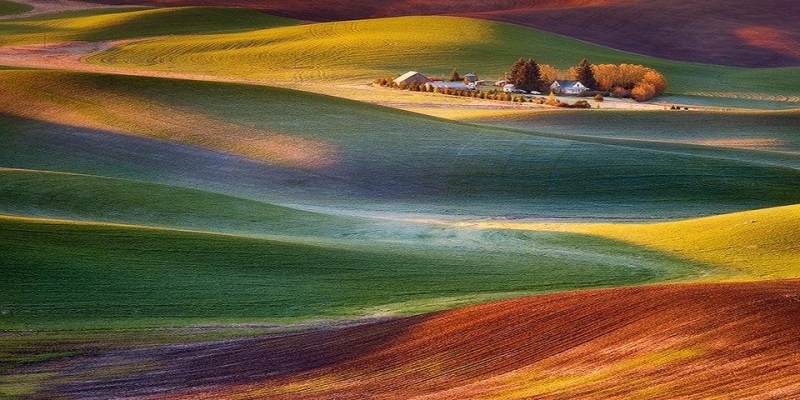
start with the easier blend of the two, “Winter Morning Palouse”. First, I talk about the “in
field” technique I use for shooting multiple exposures. Then, I demonstrate various RAW
adjustments I make to the images before the blend, and then take you through my hand blending
procedure using luminosity masks. From there we move on to Photoshop for some finishing touches
and artistic effects. With the second of the two images, “Palouse Lupine Rays”, we go through the
entire process of blending an image for both depth of field and dynamic range. With this last
example, I start by going over my “in field” technique for capturing the different exposures
needed for both the depth of field blend and the dynamic range blend. From there, I talk about
RAW adjustments, and then I demonstrate how to blend multiple exposures for depth of field in
both Photoshop and Helicon Focus. Next, we work on the dynamic range, blending multiple exposures
by hand with luminosity masks. From there, we move on to blending our final image, and then work
on the final image in Photoshop, making adjustments for contrast, color, and applying some of my
favorite tools for artistic effect.Seems like the videos is not for sale on his website anymore.
https://www.chipphillipsphotography.com/Other/Videos/n-j6rMms